EasyOrg Features
The EasyOrg features mirror to a large extent the above mentioned Org mode syntax. Several of the EasyOrg features are explained in the Editor and Agenda sections of this documentation. Below we explain some of the EasyOrg features specifically related to Org mode.
Add/Edit Todos
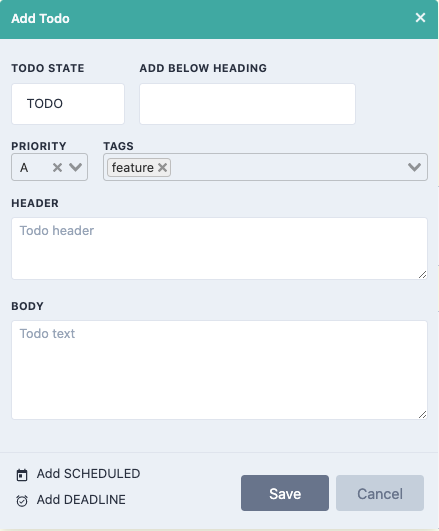
You can add a Todo by using the 'Add Todo' button in the upper right corner. A Pop-up window will show a form where you can write down a header text (mandatory), a body text (optional) as well as, if you like, select a priority level, assign one or many tags and select the Todo state (eg. TODO or WAIT). You can also chose which heading in the text document the Todo should be placed under. When you press 'Save' the todo will be placed in the text file and you will also see it in the Agenda.
It might be that you have to scroll to see the newly added Todo in case it is not directly visible due to it's sorting, timestamps and priority.
It's also possible to edit a Todo using the GUI. Simply click the options menu shown as '...' in the lower right of the Todo and select 'Edit' or simply double-click the Todo. The Edit pop-up window will show a form with the current data of the Todo. You can edit as you like and then press the 'Update' button. You can also press the 'Cancel' button and any edits you made in this window will be discarded.
Note that you can move around the pop-up window in case it is covering text you want to refer to in the Agenda. You can also scroll the agenda as necessary while the Add/Edit window is open.
Searching in the Agenda also works while the Add/Edit window is open. This is great if you need to refer to other data or Todos in your file while at the same time writing and updating a Todo.
The Editor is also available for review and search, however you cannot edit using the Editor while the Add/edit window is open.
Delete Todos
You can delete a Todo by using the options menu shown as '...' in the lower right of the Todo. Click 'Delete' and a confirmation pop-up will show to confirm you want to delete.
Change State
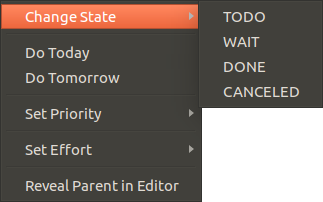
You can change the state of a Todo by right-clicking on the Todo's header and from the context menu that appear select 'Change State' and then the state you want to change it to.
You can of course also use the Editor window to change the state if you like.
Priority
You can insert the TODOs priority from the Agenda panel by using the right mouse-click context menu and selecting a priority level.
Effort
From the Agenda panel, using the right mouse-click context menu on a TODO you can insert the estimated effort required to complete the task. If the task already has an effort, then it gets updated to the new value.
You can also insert the effort template from the editor menu if you prefer. Place the cursor on the TODO you want to add the effort to. Once inserted you have to add the value yourself in hours, for example 0:30 for 30 minutes, 1:00 for 1 hour.
In the editor you can hide and show the Effort drawer in case it makes the document too busy. You do that using Ctrl+right-arrow to hide and then show it again with Ctrl+left-arrow.
In the agenda the effort it shown in the TODO header within square brackets just next to the priority in case it's defined for the TODO (eg. [0:30]).
Todo's with effort of 30min or less will appear in the agenda under 'Quick Picks'.
Tags
When creating or updating a Todo via the GUI you can select existing tags to add to your Todo or create new ones by typing them out. Tags which have already been used in the current file will show up in the Tags selector. This makes it easy to pick existing ones instead of accidentally creating duplicates with slightly different wording.
Links
You can add links to your Todos and you can follow the links by clicking on them in the Agenda. Internal links link within the same document and external links link to web pages or to files on your computer. Clickable links are underlined to easily identify them.
See the Org Mode Basics section for syntax and more details about links.
Internal Links
Internal links link to link targets within the document. Link targets are unique names within double angle brackets, eg. <<link-target>>. The link target should be unique within the document as it will jump to the first found link target with that name. A link to this link target would look like [[link-target]].
You can follow a link by clicking on it.
Once you have jumped to the link target and you want to go back to the Todo where the link was, you can click the back button in the menu on top. This arrow button is only visible in case you have already followed a link. You can jump several steps back in case you followed several links in succession.
To make it easier to link between Todos, there is a context menu option called 'Create and Copy ID' which creates a CUSTOM_ID property with a unique timestamped ID and copies it to the clipboard. You can then paste it into another Todo to create a link back to the previous Todo. This creates a link that looks like [[#20230514-130433]].
You can also create links to a headline text. You can take a few words from a headline you want to link to and include it in a link whcih start with a star (*) like so: [[*In this todo we talk about]]. If you click on such a link it will take you to the first header that contains these exact words.
Links to Files
It's also possible to link to targets in other files. You do that by adding the word 'file' followed by colon like file: and then the file name followed by double colon and then the link target like [[file:my-file-name.org::link-target]]. When linking to external files you can use link targets, CUSTOM IDs and header texts just like internal links.
[[file:my-file-name.org::link-target]]
[[file:my-file-name.org::*First few words of header]]
[[file:my-file-name.org::#20230514-130433]]
Backlinks
If your Todo has a CUSTOM_ID or ID property defined then you can click the 'Backlinks' link to see which other Todos are linking to it, i.e. linking back to it. Clicking the 'Backlinks' basically performs a custom search in links within the document linking to the Todo's CUSTOM_ID/ID or its link targets (<<>>).
External Links
External links link to websites or files on your computer. Following a website link opens the web page in your web browser. Following a file link opens the default application for that file type.
[[https://easyorgmode.com]]
[[https://easyorgmode.com][EasyOrg]]
[[file:/home/user/myfile.pdf]]
Hover over links
If you hover over a link you will see a tooltip with the header content of the target. This way you do not need to click and follow to the other location to see what's there. This works both for within the file and with outer org-files. The org-file has to already been opened within EasyOrg for it to work though.
Embedding Images
In addition to linking to an external image, it's often interesting to enhance your text content with an embedded image. Images can be embedded in your org-document by using the below syntax..
Using relative path:
[[./my-image.png]]
Using absolute path:
[[/home/user/my-image.png]]
Timestamps and Scheduling
Timestamps can be added to an existing Todo via the actions button in the lower right of the Todo. Select 'Deadline' or 'Schedule' and a Datepicker will show up where you can select the date and time.
You can delete a scheduling timestamp using the same actions button and selecting 'Deadline' or 'Schedule'.
Schedule is intended to be used for when you expect or plan to work on this Todo. A deadline is when the Todo is supposed to be finished.
Promote To Today/Tomorrow
The 'Do Today' and 'Do Tomorrow' functions in the Agenda panels context menu gives you the possibility to set the SCHEDULED timestamp to today or tomorrow's date respectively. This feature is useful for example at the start of your day you can go through your list and mark the TODOs you want to do today. Similarly, in the evening, you can go through your list and mark the TODOs you want to do tomorrow.
Created At timestamps
When you create a Todo using the Add GUI window a Created At timestamp is added to the Todo automatically. It is shown on the lower right corner of the Todo.
The Created At timestamp is stored in the text file as an Org property with the name CREATED.
If you do not want to create these timestamps then you can turn it off from the Settings.
Create and Copy ID
From the context meny (right click on a Todo) you can select to insert a unique ID to the todo. This allows for easy linking to this Todo from another Todo. The unique ID is stored as an org property named CUSTOM_ID. When you click the 'Create and Copy ID' the ID is copied to the clipboard and when you paste it into another Todo it will show up as an internal link to the previous todo.
You can in the Settings define if you want to insert a CUSTOM_ID property or an ID property. The value inserted for the CUSTOM_ID will be a timestamp and the value for ID will be a UUID (a long unique id).
Reveal TODO from Agenda <-> Editor
In the Agenda panel, if you left-click with the mouse on any TODO header, the same TODO will be scrolled into view in the editor.
If you right-click with the mouse and select 'Reveal Parent' in the context menu, the TODOs parent heading will scroll into view. This could be useful if you want to see which heading it belongs to of if you manually want to add another TODO just below the heading.
Similarly, if you right-click with the mouse on the TODO header in the editor, and select 'Reveal in Agenda' from the context menu, the TODO will scroll into view in the Agenda panel.
These features are convenient to find the TODO in each respective panel.
Closing Notes
When marking a TODO as DONE, whether from the editor or from the Agenda, a 'Closing Note:' row is added as the last line of the body including a timestamp when the TODO was marked as done. Here you can add any text you want related to the TODO such as how you solved any issues, reasons why you did it a certain way or any other short or long details for future reference.
In addition a CLOSED timestamp is added.
You can disable and enable the usage of Closing Notes and CLOSED timestamps in the Settings.
Item History / Scroll History
To simplify navigation between previously visited Todos, the last 10 visited todos will be stored in a history. You can then jump bakwards and forwards in the history by clicking the left and right arrows in the menu bar. Todos are stored in the history when you add or edit a Todo or when you click on it or follow an internal link. It makes it easier to jump back to where you where previously.
Autosave
If autosave is enabled in the Settings then each time a change is done of the text in the editor, then it is saved automatically to file. It doesn't matter if you type yourself in teheditor or you use the GUI to add or update the text.
File History / File Versioning
If File History is activated in the Settings then the state of the current file will be saved at the same time as a manual save or autosave is performed.
A minimum distance of 5 minutes is needed for a version to be stored in the file history. A maximum of 20 versions are saved.
You can view the old versions and you can also see the difference between the current file in the editor and the old version. You can see what has been added (green and underlined) and what has been removed (red and striked through).
Export to CSV
From the Table view you can export the content of your org-file to a comma separated CSV-file. Also Org properties are exported.
If you only want to export a subset of the data then you can search/filter the data as usual and when you have the subset you need, you can export it. The lines you see is what will be exported.
Print and Print-to-pdf
You can print the Agenda, Table and Preview panel content to a printer or to a pdf.
If you only want to print a subset of the data then you can search/filter the data as usual and when you have the subset you need, you can export it. The lines you see is what will be printed.
When printing a table view it is recommended to use Landscape mode to better fit all columns.
Notifications
EasyOrg can notify you of upcoming events based on the date and time you have specified. Notifications are based on the DEADLINE timestamps.
* TODO Meeting with Steve
DEADLINE: <2024-02-26 Mon 14:00>
:PROPERTIES:
:CREATED: [2024-02-22 Thu 17:10:12]
:END:
A task like the above will be stored in the EasyOrg notification scheduler and a notification toast will be shown through the operating system's native notification UI. The heading will be used as the body of the notification and the filename will be used as the title.
Notifications can be turned on and off from the Settings menu.
Notifications are shown at the time specified in the DEADLINE timestamp.
EasyOrg has to be able to individually distinguish between tasks within the notification system to make it possible to update a date or time or to remove the notification for the task all together. This is done by using the CREATED property. In case you do not have the 'Insert CREATED property' activated in the settings then everytime you create a task with a DEADLINE using the GUI, such a CREATED property will be added for you anyway (if you have notifications activated). This will also be added during an update of a task.
Passive Notifications
In addition to receiving notification toasts, EasyOrg also shows an alarm bell (🔔) in the Agenda/Preview in case the DEADLINE timestamp is x days from today or if it is past. The number of days in advance to show the alarm bell can be defined in the Settings. It's a good way to bring attention to approaching deadlines.
Advanced
There are several more advanced features within Org mode. Many of them are related to configuration.
STARTUP blocks
Below is an example of a STARTUP block. You would use a STARTUP block to configure on a per file level how you would Org/EasyOrg to work. This is great if you want to use a few different Org settings in a specific file, but for most file just use the settings you have defined via the settings window.
Any settings you do on a file level would override the global settings made via the settings GUI or default Org behavior.
#+TODO: TODO WAIT | DONE CANCELED
#+PROPERTY: Effort_ALL 0 0:10 0:30 1:00 2:00 3:00 4:00 5:00 6:00 7:00
#+STARTUP: lognotedone
#+PRIORITIES: A D C
Let's break down what each line above does.
This line sets the TODO and DONE states you would like to use in a particular file.
#+TODO: TODO WAIT | DONE CANCELED
This line defines the property Effort_ALL which is used to define the effort levels used in your file. In this case 10 minutes, 30 minutes, 1 hour, 2 hours, 3 hours etc.
#+PROPERTY: Effort_ALL 0 0:10 0:30 1:00 2:00 3:00 4:00 5:00 6:00 7:00
The following line defines how you want to handle logging when changing the state to DONE. In this case we say that we want to log with a Closing Note and timestamp.
#+STARTUP: lognotedone
Setting the above to logdone would mean only mark it with a closing timestamp. Setting it to nologdone would tell EasyOrg to not log anything when marking the Todo as DONE.
The last block lets us define the priorities used in this file using the letters from A to Z with A as highest priority. The first character position defines the highest priority (A in this case), the middle defines the lowest (D) and the last character defines the default priority (C). The highest priority character has to come before the lowest priority character in the alphabet.
#+PRIORITIES: A D C